Type
Crochet
Difficulty
intermediate
Category
amigurumi
AI Thinking Process
Planning
Verification
Pattern
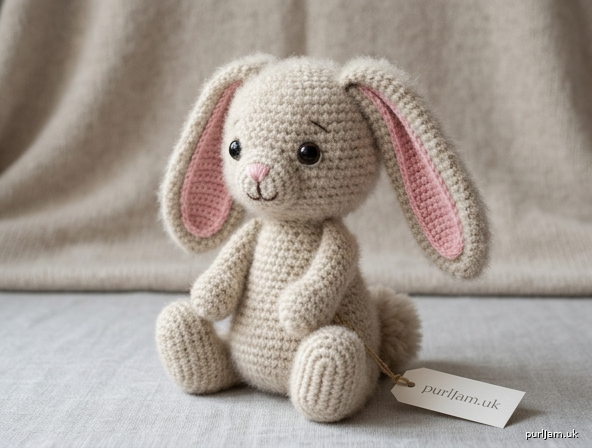
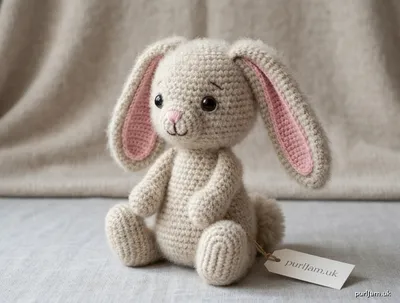
Small Fluffy Realistic Bunny
Crochet Amigurumi Pattern (US Terms)
Skill level: Intermediate
Construction: Separate pieces (head, snout, body, front legs, hind legs, ears, inner ears, tail), stuffed and sewn. Sitting pose.
A small sitting bunny with a softly elongated head, oval snout, long lined ears, and shaped hind feet. Worked in worsted yarn at a tight amigurumi gauge, then brushed for a realistic fluffy halo.
Finished Size
Approximately 5½ inches (14 cm) tall sitting, not including ears.
Approximately 8 inches (20.5 cm) tall including ears.
Head diameter approximately 2¼ inches (5.5 cm).
Size will vary with gauge, stuffing, and how firmly the ears are sewn.
Materials
- Main color (MC) — worsted weight yarn, 80 yd (73 m). Cream, oatmeal, gray, or light brown. Smooth acrylic or wool-blend brushes well for the fluffy finish (examples: Lion Brand Vanna’s Choice, Red Heart Super Saver, a wool worsted).
- Contrast color (CC) — worsted weight yarn, 15 yd (14 m), pink or blush, for inner ears and nose embroidery.
- Scrap dark brown or black worsted or embroidery floss, for mouth (optional nose if not using CC).
- US E-4 (3.5 mm) crochet hook, or size needed to obtain gauge (fabric must be tight).
- 8 mm safety eyes with washers — 2.
- Polyester fiberfill stuffing.
- Stitch marker.
- Yarn needle.
- Scissors.
- Pet slicker brush (for fluffy finish).
- Optional: pink colored pencil or pastel for a hint of inner-ear / cheek color.
Yarn note: If you substitute a fluffy yarn (chenille, velvet, or worsted held with lace-weight mohair), skip the brushing step and consider going down to a US D-3 (3.25 mm) hook so stuffing does not show.
Gauge
5 sc and 5 rnds = 1 inch (2.5 cm) in single crochet, worked in the round.
Gauge is essential for a firm fabric. If stuffing shows between stitches, use a smaller hook. Do not worry about matching a sweater gauge; amigurumi fabric should be dense.
Abbreviations (US)
- MR — magic ring (magic circle)
- ch — chain
- sc — single crochet
- inc — increase (2 sc in the same stitch)
- dec — invisible decrease (single crochet 2 stitches together through the front loops)
- sl st — slip stitch
- st(s) — stitch(es)
- rnd(s) — round(s)
- FO — fasten off
- BLO — back loop only
- (...) × n — work the stitches in parentheses n times
Pattern Notes
- Work in a continuous spiral unless stated otherwise. Do not join or chain at the start of rounds. Mark the first stitch of each round and move the marker up.
- Use the invisible decrease for a smoother fabric.
- Stuff firmly as directed, shaping as you go. Under-stuffing makes the bunny look saggy; over-stuffing at the neck makes the head hard to sew on.
- Parentheses at the end of a round show the stitch count after that round is complete.
- Safety eyes are a choking hazard. Do not use safety eyes on a toy for a child under 3 years. Embroider eyes instead.
- Left and right are from the bunny’s perspective when sitting and facing you.
Head
With MC.
Rnd 1: 6 sc in MR. (6)
Rnd 2: inc in each st around. (6 inc → 6 + 6 = 12 ✓)
Rnd 3: (sc, inc) × 6. (6 inc → 12 + 6 = 18 ✓)
Rnd 4: (2 sc, inc) × 6. (6 inc → 18 + 6 = 24 ✓)
Rnd 5: (3 sc, inc) × 6. (6 inc → 24 + 6 = 30 ✓)
Rnd 6: (4 sc, inc) × 6. (6 inc → 30 + 6 = 36 ✓)
Rnds 7–13: sc in each st around. (36 sts, 7 rounds even)
Safety eyes: Insert 8 mm safety eyes between Rnds 10 and 11, 8 stitches apart (count 8 stitches between the posts). Do not snap the washers yet.
Eye indent (do this before snapping washers): Thread a 12 inch (30 cm) length of MC on a yarn needle. Bring the needle out just inside the left eye post, across the inside of the head, and out just inside the right eye post. Return the same way and pull snug until both eyes sink into shallow sockets. Tie a firm square knot on the inside. Snap the washers on. This indent is what makes the face look realistic rather than spherical.
Rnd 14: (4 sc, dec) × 6. (6 dec → 36 − 6 = 30 ✓)
Rnd 15: (3 sc, dec) × 6. (6 dec → 30 − 6 = 24 ✓)
Begin stuffing the head firmly, filling the cheeks and keeping a slightly oval shape (a little longer front-to-back than side-to-side).
Rnd 16: (2 sc, dec) × 6. (6 dec → 24 − 6 = 18 ✓)
Rnd 17: (sc, dec) × 6. (6 dec → 18 − 6 = 12 ✓)
Finish stuffing.
Rnd 18: dec × 6. (6 dec → 12 − 6 = 6 ✓)
FO, leaving a 6 inch (15 cm) tail. Thread the tail through the front loops of the remaining 6 sts, pull closed, and weave in.
Snout
With MC.
Foundation: Ch 4.
Rnd 1: Sc in 2nd ch from hook, sc in next ch, 3 sc in last ch; rotate to work along the opposite side of the chain, sc in next ch, 2 sc in remaining ch. (8)
[Check: 1 + 1 + 3 + 1 + 2 = 8 ✓]
Rnd 2: Inc, sc, inc in next 3 sts, sc, inc in next 2 sts. (8 sts + 6 inc → 14 ✓)
Rnd 3: Sc in each st around. (14)
FO, leaving a 10 inch (25 cm) tail for sewing. Do not stuff yet.
Body
With MC. The body is slightly pear-shaped so the bunny sits.
Rnd 1: 6 sc in MR. (6)
Rnd 2: inc in each st around. (6 inc → 12 ✓)
Rnd 3: (sc, inc) × 6. (6 inc → 18 ✓)
Rnd 4: (2 sc, inc) × 6. (6 inc → 24 ✓)
Rnd 5: (3 sc, inc) × 6. (6 inc → 30 ✓)
Rnd 6: (4 sc, inc) × 6. (6 inc → 36 ✓)
Rnd 7: (5 sc, inc) × 6. (6 inc → 42 ✓)
Rnds 8–13: sc in each st around. (42 sts, 6 rounds even)
Rnd 14: (5 sc, dec) × 6. (6 dec → 42 − 6 = 36 ✓)
Rnds 15–16: sc in each st around. (36 sts, 2 rounds even)
Rnd 17: (4 sc, dec) × 6. (6 dec → 36 − 6 = 30 ✓)
Rnd 18: sc in each st around. (30)
Rnd 19: (3 sc, dec) × 6. (6 dec → 30 − 6 = 24 ✓)
Stuff the body firmly, rounding the base (the increase end is the sitting bottom) and tapering toward the neck.
Rnd 20: (2 sc, dec) × 6. (6 dec → 24 − 6 = 18 ✓)
Rnd 21: (sc, dec) × 6. (6 dec → 18 − 6 = 12 ✓)
Add a last bit of stuffing at the neck so the head has a solid platform, but do not stretch the opening.
Rnd 22: dec × 6. (6 dec → 12 − 6 = 6 ✓)
FO, leaving an 18 inch (46 cm) tail for sewing the head. Close the remaining hole as for the head, but keep the long tail free for assembly.
Front Legs (make 2)
With MC. Small tubular legs with a slight paw ridge.
Rnd 1: 6 sc in MR. (6)
Rnd 2: inc in each st around. (6 inc → 12 ✓)
Rnd 3: BLO sc in each st around. (12) — this ridge suggests a paw.
Rnds 4–9: sc in each st around. (12 sts, 6 rounds even)
Stuff the lower two-thirds (paw end) firmly; leave the top ½ inch (1.3 cm) lightly stuffed or empty so the legs sew flat to the body.
FO, leaving a 12 inch (30 cm) tail. Do not close the top; you will sew it to the body.
Hind Legs (make 2)
With MC. Oval foot, then a shorter, thicker leg so the bunny sits.
Foundation: Ch 6.
Rnd 1: Sc in 2nd ch from hook, sc in next 3 ch, 3 sc in last ch; rotate to work along the opposite side of the chain, sc in next 3 ch, 2 sc in remaining ch. (12)
[Check: 4 + 3 + 3 + 2 = 12 ✓]
Rnd 2: Inc, 3 sc, inc in next 3 sts, 3 sc, inc in next 2 sts. (12 sts + 6 inc → 18 ✓)
Rnd 3: Sc in each st around. (18)
Rnd 4: 4 sc, dec × 3, 8 sc. (3 dec → 18 − 3 = 15 ✓) — decreases sit on top of the foot (instep).
Rnd 5: 3 sc, dec × 3, 6 sc. (3 dec → 15 − 3 = 12 ✓)
Rnds 6–10: sc in each st around. (12 sts, 5 rounds even)
Stuff the foot firmly so it holds an oval shape; stuff the leg lightly.
FO, leaving a 14 inch (36 cm) tail. Leave the top open for sewing.
The three-decrease cluster is the top of the foot. When attaching, that cluster faces up/in toward the body.
Ears (make 2)
With MC. Long and unstuffed so they drape like real bunny ears.
Rnd 1: 6 sc in MR. (6)
Rnd 2: (sc, inc) × 3. (3 inc → 9 ✓)
Rnd 3: (2 sc, inc) × 3. (3 inc → 12 ✓)
Rnd 4: (3 sc, inc) × 3. (3 inc → 15 ✓)
Rnd 5: (4 sc, inc) × 3. (3 inc → 18 ✓)
Rnds 6–15: sc in each st around. (18 sts, 10 rounds even)
Rnd 16: (4 sc, dec) × 3. (3 dec → 18 − 3 = 15 ✓)
Rnds 17–18: sc in each st around. (15 sts, 2 rounds even)
FO, leaving a 12 inch (30 cm) tail. Do not stuff. Flatten the ear. The open edge will be sewn to the head.
Inner Ears (make 2)
With CC (pink).
Rnd 1: 6 sc in MR. (6)
Rnd 2: (sc, inc) × 3. (3 inc → 9 ✓)
Rnd 3: (2 sc, inc) × 3. (3 inc → 12 ✓)
Rnds 4–12: sc in each st around. (12 sts, 9 rounds even)
Rnd 13: (2 sc, dec) × 3. (3 dec → 12 − 3 = 9 ✓)
FO, leaving a 10 inch (25 cm) tail. Do not stuff. Flatten.
The inner ear is shorter and narrower than the outer ear so a MC border shows all around.
Tail
With MC. (For extra fluff, substitute a 1¼ inch / 3 cm pom-pom in the same yarn.)
Rnd 1: 6 sc in MR. (6)
Rnd 2: inc in each st around. (6 inc → 12 ✓)
Rnd 3: (sc, inc) × 6. (6 inc → 18 ✓)
Rnd 4: sc in each st around. (18)
Rnd 5: (sc, dec) × 6. (6 dec → 18 − 6 = 12 ✓)
Stuff firmly into a round ball.
Rnd 6: dec × 6. (6 dec → 12 − 6 = 6 ✓)
FO, leaving a 10 inch (25 cm) tail. Close the remaining hole and keep the tail for sewing.
Assembly
Use matching yarn tails and a yarn needle. Pin every piece before sewing and check that the bunny sits level.
1. Snout and face.
Center the snout on the lower third of the head, covering roughly Rnds 11–15, with the oval running horizontally. The top edge of the snout should sit just below and between the eyes, leaving a small gap so the indent still shows. Stuff the snout very lightly (a pinch of fiberfill) as you sew it down with whipstitch through the back loops of Rnd 3, so it stays a shallow oval, not a ball.
With CC, embroider a small inverted triangle or Y-shaped nose on the front of the snout, about ⅜ inch (1 cm) wide. With dark brown or black, add a short vertical stitch down from the nose and a tiny curved mouth, no wider than ½ inch (1.3 cm). Keep the expression small; a large mouth reads cartoonish.
Optional: a single straight stitch at the outer corner of each eye as a shallow lid.
2. Ears.
Sew one inner ear onto the flattened inside of each outer ear, CC side in, leaving an even MC border of about ⅛–¼ inch (3–6 mm). Do not sew the bottom ½ inch (1.3 cm) of the inner ear so the base can be pinched.
Pin the ears to the top of the head, spanning Rnds 4–8, angled slightly backward and about 4 stitches apart at the inner edges. They should sit behind the eye line, not directly above the eyes. Pinch each ear base into a shallow U (front edges closer together than the back) and sew through all layers around the open edge. This pinch makes them stand with a natural rabbit curve. Weave in ends.
3. Head to body.
The body’s Rnd 22 end is the neck. Seat the head on the neck so the snout points slightly down (a realistic foraging angle) and the ears tilt back. Sew all the way around, adding a pinch of stuffing at the joint if the neck looks thin. The head should not wobble.
4. Hind legs.
These set the sitting pose. Place each hind leg on the lower side of the body, foot pointing forward and slightly out, instep (the decrease cluster) facing up. The top open edge of the leg should sit around Rnds 10–14 of the body, with the foot extending past the front of the body so the bunny rests on the feet and the bottom of the body together. Sew the open edge closed against the body, then tack the inner side of each foot to the body with two small stitches so the feet do not splay. Check that the bunny sits upright before fastening off.
5. Front legs.
Place the front legs on the upper front of the body, just below the head seam, about 3–4 stitches apart, paws down and slightly inward as if the bunny were sitting on its haunches. Sew the open tops to the body. Tack each paw to the body or to the inner hind foot with one hidden stitch if you want them to stay put.
6. Tail.
Sew the tail to the lower back of the body, centered, covering roughly Rnds 8–12, sitting just above the surface the bunny rests on. A tail that is too high looks like a pom-pom stuck on; keep it low.
Weave in every remaining end before brushing.
Fluffy Finish
This step is what makes the bunny look furred rather than stitched.
- Make sure all embroidery is complete and all ends are woven in. Brushing will fuzz yarn tails into a mess if they are still loose.
- With a clean pet slicker brush, brush the MC fabric in short strokes, always in the same direction on each area (head: back toward the ears; body: downward; legs: toward the paws; ears: base to tip). Start gently. Acrylic pills into a halo; wool raises a softer bloom.
- Do not brush the embroidered nose, mouth, inner-ear CC (unless you want it fuzzy too), or the eye area — you can pull a safety eye loose.
- Brush the tail extra thoroughly so it reads as a cottontail.
- Trim any wild extra-long pills with sharp scissors, very sparingly, so the silhouette stays rabbit-shaped.
- Optional: a light stroke of pink pencil on the inner ears and a tap on each cheek, then blend with a finger.
The fabric will look slightly “distressed.” That is the point. If a stitch looks loose after brushing, push it back with the needle rather than pulling a new yarn through the fuzz.
Finishing Checklist
- Eyes indented and washers fully snapped (or eyes embroidered if the toy is for a child under 3).
- Head firmly attached; no gap at the neck.
- Bunny sits level on hind feet plus body base without tipping.
- Ears pinched at the base and angled back.
- All ends woven in, then fabric brushed.
Care
Spot clean with a damp cloth. Do not machine wash after brushing — the halo will mat. If the toy must be washed, place it in a pillowcase on a gentle cycle in cold water and re-brush once fully dry.
Pattern Stitch-Count Summary
| Piece | Max sts | Closing rnd |
|---|---|---|
| Head | 36 | 6 |
| Snout | 14 | sewn open |
| Body | 42 | 6 |
| Front leg | 12 | sewn open |
| Hind leg | 18 | 12, sewn open |
| Ear | 18 | 15, flattened |
| Inner ear | 12 | 9, flattened |
| Tail | 18 | 6 |
Enjoy your small fluffy bunny.
Disclaimer: This pattern was generated by AI and should be reviewed for accuracy before use. While we strive for quality, AI-generated content may contain errors. Please verify measurements, stitch counts, charts, and instructions before beginning your project. Generated by purlJam.uk
Love this pattern?
Save this pattern to your free PurlJam libraryAccess your pattern anytime
Bookmark this page to access your pattern anytime