Type
Crochet
Difficulty
intermediate
Category
amigurumi
AI Thinking Process
Planning
Verification
Pattern
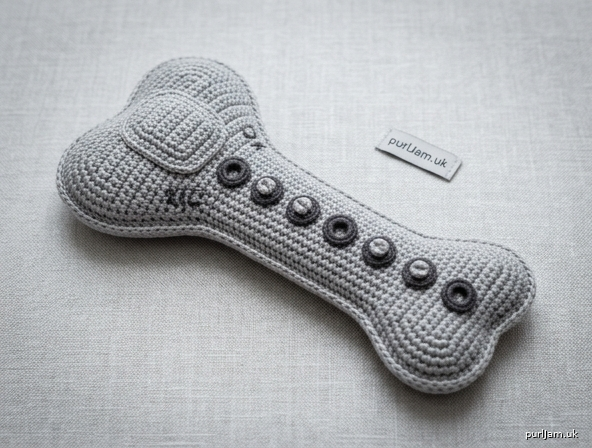
Soft Replica TPLO Orthopaedic Plate
Amigurumi-Style Educational Model (Intermediate)
A soft, lightly padded crochet replica of a canine TPLO (Tibial Plateau Leveling Osteotomy) bone plate. Designed for demonstration, teaching or veterinary-themed display. Not a medical device.
Finished size: approx. 14 cm long × 3.5 cm wide (proximal head) tapering to 2 cm (distal end) × 1 cm thick.
Yarn: DK (light worsted) cotton or cotton-blend, approx. 25 g main colour (MC) – surgical steel grey or silver recommended; small amount contrast (CC) for hole rings and engraving lines – dark grey or black.
Hook: 3 mm (UK 11) or size needed to obtain tension.
Notions: tapestry needle, stitch markers, polyester toy stuffing (very small amount), optional 6 mm safety eyes or beads only if used as decorative “screw heads” (sew securely; omit for pure soft toy).
Tension (gauge): 22 dc and 24 rows = 10 cm exactly over plain dc. Adjust hook if necessary.
Abbreviations (UK terminology):
- ch – chain
- dc – double crochet (US sc)
- dc2tog – double crochet 2 together (decrease)
- htr – half treble (US hdc)
- ss – slip stitch
- st(s) – stitch(es)
- RS – right side
- WS – wrong side
- MC / CC – main / contrast colour
- [ ] – work instructions in brackets as directed
- (n) – stitch count at end of row/round
Notes:
- Work both plate panels identically so they mirror when RS faces outward.
- Keep stuffing sparse—aim for a firm, almost flat plate, not a rounded cushion.
- All dc are worked in both loops unless stated.
- Inline counts are validated thus: (example 6 increases → 12 + 6 = 18 ✓).
Pieces
Plate Panel (make 2)
With MC, ch 19.
Row 1 (RS): dc in 2nd ch from hook and in each ch to end, turn. (18)
Row 2: ch 1, dc in each st to end, turn. (18)
Rows 3–4: as Row 2.
Shape proximal head (wider end) Row 5: ch 1, 2 dc in first st, dc to last st, 2 dc in last st, turn. (20) (2 inc → 18 + 2 = 20 ✓)
Row 6: ch 1, dc across, turn. (20)
Row 7: ch 1, 2 dc in first st, dc to last st, 2 dc in last st, turn. (22)
Row 8: ch 1, dc across, turn. (22)
Row 9: ch 1, 2 dc in first st, dc to last st, 2 dc in last st, turn. (24)
Row 10: ch 1, dc across, turn. (24)
Row 11: ch 1, 2 dc in first st, dc to last st, 2 dc in last st, turn. (26)
Row 12: ch 1, dc across, turn. (26)
Row 13: ch 1, 2 dc in first st, dc to last st, 2 dc in last st, turn. (28)
Row 14: ch 1, dc across, turn. (28)
Row 15: ch 1, 2 dc in first st, dc to last st, 2 dc in last st, turn. (30)
Row 16: ch 1, dc across, turn. (30)
Row 17: ch 1, 2 dc in first st, dc to last st, 2 dc in last st, turn. (32) (widest – head region)
Rows 18–22: ch 1, dc across, turn. (32) — 5 rows even for head length.
Begin gentle taper toward shaft Row 23: ch 1, dc2tog, dc to last 2 sts, dc2tog, turn. (30)
Row 24: ch 1, dc across, turn. (30)
Row 25: ch 1, dc2tog, dc to last 2 sts, dc2tog, turn. (28)
Rows 26–28: ch 1, dc across, turn. (28)
Row 29: ch 1, dc2tog, dc to last 2 sts, dc2tog, turn. (26)
Rows 30–32: ch 1, dc across, turn. (26)
Row 33: ch 1, dc2tog, dc to last 2 sts, dc2tog, turn. (24)
Rows 34–38: ch 1, dc across, turn. (24) — mid-shaft
Row 39: ch 1, dc2tog, dc to last 2 sts, dc2tog, turn. (22)
Rows 40–44: ch 1, dc across, turn. (22)
Row 45: ch 1, dc2tog, dc to last 2 sts, dc2tog, turn. (20)
Rows 46–50: ch 1, dc across, turn. (20)
Row 51: ch 1, dc2tog, dc to last 2 sts, dc2tog, turn. (18)
Rows 52–56: ch 1, dc across, turn. (18)
Row 57: ch 1, dc2tog, dc to last 2 sts, dc2tog, turn. (16)
Rows 58–60: ch 1, dc across, turn. (16)
Final distal taper Row 61: ch 1, dc2tog, dc to last 2 sts, dc2tog, turn. (14)
Rows 62–64: ch 1, dc across, turn. (14)
Fasten off, leaving a 40 cm tail on one panel only for seaming.
Head Contour Accent (make 1, optional but recommended for realism)
With MC, ch 13.
Row 1: dc in 2nd ch from hook and each ch to end, turn. (12)
Rows 2–4: ch 1, dc across, turn. (12)
Row 5: ch 1, dc2tog, dc 8, dc2tog, turn. (10)
Row 6: ch 1, dc across, turn. (10)
Row 7: ch 1, dc2tog, dc 6, dc2tog, turn. (8)
Row 8: ch 1, dc across. (8)
Fasten off, leave long tail for sewing. This sits on the proximal (wide) end to suggest the thickened/contoured head of a TPLO plate.
Screw-Hole Marker Rings (make 8–10)
With CC, ch 2, 6 dc in 2nd ch from hook, ss to first dc to form a tight ring. (6) Fasten off, leave tail for sewing. Make 8 for a typical short plate or 10 for a longer look.
Screw Studs / Decorative Heads (make 6–8, intermediate detail)
These are the small “limb-like” separate pieces.
With CC (or metallic yarn), make a magic ring.
Rnd 1: 6 dc into ring. (6)
Rnd 2: dc in each st around. (6)
Rnd 3: dc in each st around, ss to close. (6) Fasten off, leave tail. Stuff very lightly with a few fibre wisps or leave hollow. These are sewn over selected hole rings to look like screw heads.
Assembly Instructions
-
Join the plate panels
Place the two panels with WS together (RS outward). Using the long MC tail and tapestry needle (or dc join if preferred), mattress-stitch or whip-stitch all around the edge, leaving a 3 cm opening on one long side. Insert a very thin layer of stuffing—just enough to give slight rigidity and a 1 cm finished thickness. Do not overstuff; the piece must remain plate-flat. Close opening. (Seam should be smooth and even.) -
Attach head contour
Centre the Head Contour Accent on the proximal (widest) third of the plate, on the “top” face. Sew neatly around all edges with MC so it sits as a shallow raised pad. -
Position screw-hole markers (safety-eyes equivalent)
Using the photo reference of a standard TPLO plate or the guide below, space the CC rings along the centre line:- 2 rings clustered on the head/contour area
- remaining rings evenly down the shaft at approx. 1.5–1.8 cm intervals
Sew each ring firmly through both layers of the plate so the stitches anchor front to back. This prevents shifting and keeps the model washable.
-
Add screw studs
Sew a Screw Stud centred on top of 6–8 of the rings (leave 2 rings empty if you want “open” holes). Anchor with multiple passes. If using safety eyes/beads as screw heads, install them through the rings before final stuffing closure, or sew beads on securely now. -
Surface embroidery (optional realism)
With CC, embroider a few short straight stitches beside the head to suggest manufacturer logo or compression slots. Keep minimal. -
Finishing
Weave in all ends securely. Gently steam-block under a damp cloth if cotton (do not crush the slight padding). Check that no stuffing shows and all small parts are firmly attached.
Placement Guide (text diagram)
Proximal HEAD (wide)          Distal END (narrow)
[====contour====]
 O  O     ← 2 head screws
   O
   O      ← shaft screws spaced ~1.6 cm
   O
   O
   O
   O
(14 cm total length)
Care
Surface clean or gentle hand wash cold; reshape flat and dry thoroughly. Not suitable for heavy child play if beads/safety eyes are used—supervise or omit hard parts for under-36 months.
Pattern notes for technical accuracy
- Widest point 32 sts × (10 cm / 22 sts) ≈ 14.5 cm length when rows run longitudinally; width at head 32 rows not applicable—width is stitch count on short axis after seaming ≈ 3.5 cm. Distal 14 sts ≈ 2 cm. All decrease steps net correctly as annotated.
- Intermediate skills used: even tension on flat panels, clean mattress join, small magic-ring studs, accurate marker placement.
End of pattern.
Disclaimer: This pattern was generated by AI and should be reviewed for accuracy before use. While we strive for quality, AI-generated content may contain errors. Please verify measurements, stitch counts, charts, and instructions before beginning your project. Generated by purlJam.uk
Love this pattern?
Save this pattern to your free PurlJam libraryAccess your pattern anytime
Bookmark this page to access your pattern anytime