Type
Knitting
Difficulty
intermediate
Category
custom
AI Thinking Process
Planning
Verification
Pattern
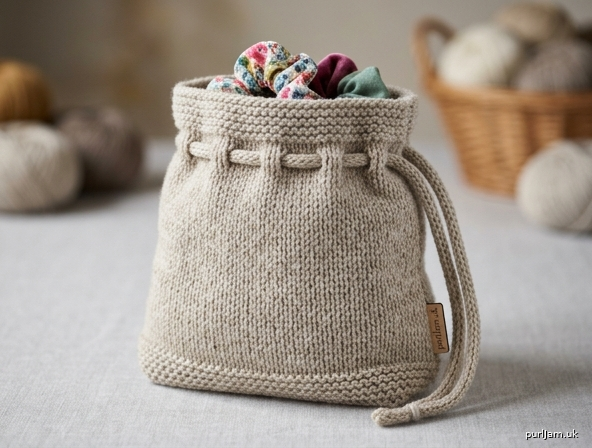
The Scrunchies Bag
A quick, beginner-friendly drawstring pouch — perfect for corralling hair scrunchies, small notions, or little treasures.
This little bag is worked flat in one piece, then seamed at the sides. A row of eyelets near the top carries a knitted I-cord drawstring that cinches the bag closed. If you can knit, purl, yarn over, and knit two together, you can make this!
Finished Measurements
- Width: approximately 7 in (18 cm), flat
- Height: approximately 8 in (20 cm)
- One size.
Materials
- Yarn: Worsted weight (Medium / #4), approximately 90–110 yds (82–100 m). One skein of most worsted yarns is plenty.
- Needles: US 8 / 5 mm straight or circular needles.
- Notions:
- 2 double-pointed needles US 8 / 5 mm (or one shorter needle) for the I-cord drawstring
- Tapestry needle for seaming and weaving in ends
- Scissors
Gauge
18 stitches and 24 rows = 4 in (10 cm) in stockinette stitch, blocked.
Gauge is not critical for a bag, but a different gauge will change the finished size and yardage.
Abbreviations (US)
- k – knit
- p – purl
- yo – yarn over
- k2tog – knit two stitches together (a right-leaning decrease of 1 stitch)
- st(s) – stitch(es)
- RS – right side
- WS – wrong side
- St st – stockinette stitch (knit on RS, purl on WS)
- rep – repeat
Pattern Notes
- The bag is worked flat as a single rectangle, from the bottom edge up to the top opening.
- The rectangle is then folded in half and seamed along the two sides. The cast-on edge becomes the base of the bag; the bound-off edge becomes the top opening.
- The eyelet row creates evenly spaced holes for threading the drawstring.
- Garter stitch (knit every row) borders keep the edges from curling.
Instructions
Body
Cast on 64 stitches. (64 sts)
Bottom border (garter stitch):
- Rows 1–6: Knit all stitches. (6 rows garter stitch)
Main body (stockinette stitch):
- Row 7 (RS): Knit all 64 sts.
- Row 8 (WS): Purl all 64 sts.
- Rep Rows 7–8 a total of 22 times (44 rows worked). (6 border rows + 44 St st rows = 50 rows; ≈ 50 ÷ 24 × 4 = 8.3 in tall so far)
You should end having just completed a WS (purl) row, ready to work a RS row next.
Eyelet row (RS):
- Row 51 (RS): *k2tog, yo; rep from * to end.
- Check: 64 sts ÷ 2 = 32 repeats of (k2tog, yo). Each repeat uses 2 sts and produces 2 sts (1 decrease + 1 yo), so the stitch count stays at 64 sts. ✓
- Row 52 (WS): Purl all 64 sts, working each yo as a normal stitch. (64 sts)
Top border (garter stitch):
- Rows 53–58: Knit all stitches. (6 rows garter stitch)
Bind off all 64 stitches knitwise. Do not bind off too tightly — the top edge needs to gather.
I-Cord Drawstring
Using two double-pointed needles US 8 / 5 mm:
- Cast on 4 stitches.
- Knit 4 stitches. Do not turn the work.
- Slide all 4 stitches back to the right-hand tip of the needle.
- Pull the working yarn snugly across the back and knit the 4 stitches again.
- Repeat steps 3–4 until the cord measures approximately 20 in (51 cm).
- Cut yarn, thread the tail through all 4 stitches, and pull tight to close. Weave in the end.
Tip: Give the cord a gentle tug and roll it between your fingers to help it settle into a neat tube.
Finishing
- Weave in the cast-on and bind-off tails on the body, but leave the side seams for the next step.
- Fold the rectangle in half with right sides together, matching the two side edges so the piece measures approximately 7 in (18 cm) wide. The cast-on (garter) edge forms the bottom; the eyelet/top border forms the opening.
- Seam the two sides: Using the tapestry needle and a length of yarn, sew each side seam from the bottom fold up to the top border using mattress stitch or whip stitch. Stop seaming before you reach the very top so the drawstring channel stays open on both sides for cinching. Fasten off and weave in ends.
- Turn the bag right side out.
- Thread the drawstring: Starting at one side opening, weave the I-cord in and out through the eyelet holes all the way around, exiting at the same side you started. This lets both ends of the cord hang from the same point so you can pull them together to close the bag.
- Knot the two ends of the I-cord together (optional) and trim any excess.
- Block lightly if desired: gently steam or wet-block the bag flat to even out the stockinette. Let dry fully before use.
Care
Wash according to your yarn's label. For a firmer, sturdier bag, choose a yarn with a tight twist or a wool blend that fulls slightly.
Enjoy your finished Scrunchies Bag!
Disclaimer: This pattern was generated by AI and should be reviewed for accuracy before use. While we strive for quality, AI-generated content may contain errors. Please verify measurements, stitch counts, and instructions before beginning your project. Generated by purlJam.uk
Access your pattern anytime
Bookmark this page to access your pattern anytime