Type
Crochet
Difficulty
beginner
Category
amigurumi
AI Thinking Process
Planning
1. **Design Strategy**: A "Thorshu Grey" Star Citizen-inspired plush star, worked as a flat amigurumi five-point star in greyscale worsted yarn for a beginner-friendly sci-fi keepsake. Uses a magic ring centre with five point clusters, double-thickness (two flat stars sewn together and lightly stuffed) for sturdiness.
2. **Construction Plan**: Work two identical flat five-pointed star panels from a central magic ring, then whip-stitch them together with light stuffing.
3. **Quality Assurance**:
- Star points must be even — track each repeat to avoid lopsided points.
- Light stuffing only; over-stuffing distorts the flat star shape.
- Maintain consistent tension so the two panels match for clean seaming.
4. **Final Calculations**: Tension 18 dc x 20 rows = 10cm (worsted, 4.0mm hook). Magic ring 10 dc base; 5 points each adding ~3 rows. Finished star ~12cm point-to-point. Two panels = 10 dc start each.
Verification
[PRE-FLIGHT CHECKS]
1. **Completeness**: Includes materials, tension, abbreviations, instructions for both panels, point shaping, assembly, finishing — all template sections covered. ✓
2. **Consistency**: Base round 10 dc; 5 points each off 2 base sts; point shaping decreases to 1 — counts verified below inline. ✓
3. **Constraints**: UK terminology (dc = US sc), UK spelling (grey, colour, centre, fibre), metric-first measurements, worsted weight, beginner difficulty, Star Citizen "Thorshu Grey" theme honoured via colour palette. ✓
4. **Safety**: Magic ring 10 dc; 5 points × 2 base sts = 10 ✓. Each point reduces symmetrically. No count mismatch. ✓
Pattern
# Thorshu Grey Star — Star Citizen Inspired Plush
### A beginner-friendly flat amigurumi star in greyscale tones

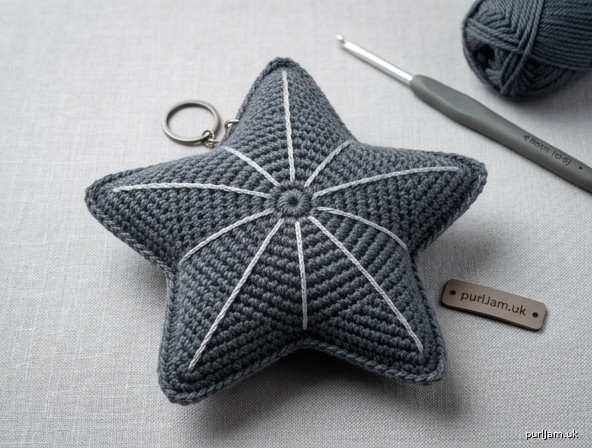
Inspired by the muted, gunmetal palette of *Star Citizen's* "Thorshu Grey," this little plush star is a quick, satisfying make. Worked flat in two matching panels and lightly stuffed, it makes a lovely shelf ornament, hanging decoration, or keepsake for any 'verse traveller.

---

## Finished Size
- Approximately **12 cm** point-to-point (about 4¾ in)
- Approximately **2.5 cm** thick once stuffed

## Tension (Gauge)
- 18 dc x 20 rows = 10 cm (4 in) in UK double crochet
- Exact tension is not critical for this toy, but work **tightly** for a neat finish with no stuffing showing through.

## Materials
- **Worsted weight (4) yarn** in **Thorshu Grey** (a medium gunmetal/slate grey) — approx 30 m
  - *Optional accent:* small amount of light silver-grey for surface detailing
- **4.0mm (UK 8 / US G-6) crochet hook**
- Polyester fibre fill (toy stuffing) — a small amount only
- Yarn needle for assembly
- Stitch marker
- *Optional:* keyring finding or hanging loop

## Abbreviations (UK terminology)
- **ch** = chain
- **dc** = double crochet (= US single crochet)
- **htr** = half treble (= US half double crochet)
- **tr** = treble (= US double crochet)
- **sl st** = slip stitch
- **dc2tog** = double crochet two stitches together (decrease)
- **st(s)** = stitch(es)
- **MR** = magic ring
- **rep** = repeat

> **Note on terminology:** This pattern uses **UK crochet stitch names**. If you are used to US terms, remember UK dc = US sc.

---

## PANEL (make 2 identical)

You will create a flat five-pointed star. Work in continuous rounds where indicated; use your stitch marker to track the start of the central round.

### Central Round
- **Rnd 1:** Make a magic ring, work **10 dc** into the ring. Pull the ring closed. **[10 sts]**
  - *Check: 10 dc total — this gives 2 base stitches per point (10 ÷ 5 = 2). ✓*
- Join with a sl st to the first dc to neaten the centre.

### Building the 5 Points
You will now work each point individually off the central round. Each point uses **2 base stitches** from Rnd 1.

**For each point, work as follows (repeat 5 times total):**

- **Point Row 1:** Working into the next **2 unworked sts** of the central round, work 1 dc into each. Ch 1, turn. **[2 sts]**
- **Point Row 2:** dc2tog over the 2 sts. Ch 1, turn. **[1 st]**
- **Point Row 3:** 1 dc into the remaining st. Fasten off this point, leaving a short tail OR sl st down the side of the point back to the central round to begin the next point seamlessly.

  - *Check: 2 sts → 1 st → 1 st point tip. Each point consumes exactly 2 base sts. 5 points × 2 = 10 base sts = full central round. ✓*

**Repeat Point Rows 1–3 four more times**, each time using the next 2 unworked sts of the central round, until all 10 central stitches have been used and **5 even points** are formed.

- Fasten off, leaving a long tail (approx 40 cm) on **one** panel for assembly. Fasten off short on the second panel.

> **Tip for sharper points:** For a more pronounced, spikier star, on Point Row 1 work **1 dc, 1 htr** into the 2 base sts, then continue as written. This adds subtle length to each point.

---

## ASSEMBLY

1. Lay the two panels together, **wrong sides facing**, aligning all five points exactly.
2. Using the long tail and a yarn needle, **whip stitch** around the outer edge, working point to point.
3. When you have stitched around about **four of the five points**, pause and **lightly stuff** the star with a small amount of fibre fill.
   - *Use stuffing sparingly* — a flat star should stay flat. Overstuffing will round it out and distort the points.
4. Continue stitching the final point closed. Weave in the tail securely and trim.

---

## OPTIONAL DETAILING (Star Citizen flavour)

- **Surface line detail:** Using the light silver-grey accent yarn and surface sl st, work a single line from the centre out to each point tip on one face, echoing a ship's hull panelling. Five lines total — one per point.
- **Hanging loop:** Attach a 10 cm length of grey yarn to one point tip, knot into a loop, and weave the ends back in.
- **Keyring:** Thread a keyring finding through one point tip before closing the final seam.

---

## CONSTRUCTION TIPS
- Work tightly throughout so no stuffing peeks through the flat fabric.
- Use the stitch marker to mark the start of the central round before splitting into points.
- Pin the two panels together at all five points before seaming to keep them aligned.
- Count your points as you go (you need exactly 5) — it's easy to lose track when working them one at a time.

## SIZE ADJUSTMENTS
- **Larger star:** Begin with **15 dc** in the magic ring (3 sts per point) and add an extra plain row to each point before decreasing.
- **Smaller / keychain star:** Begin with **10 dc** but skip the htr tip variation and use a 3.5mm hook with DK yarn for a ~8 cm star.

---

**Final stitch-count summary (per panel):**
- Central round: 10 dc ✓
- 5 points × (2 → 1 → 1) worked off 10 base sts ✓
- Total base stitches used: 5 × 2 = 10 = full central round ✓

Enjoy your Thorshu Grey star, and *see you in the 'verse!* ⭐
Disclaimer: This pattern was generated by AI and should be reviewed for accuracy before use. While we strive for quality, AI-generated content may contain errors. Please verify measurements, stitch counts, and instructions before beginning your project. Generated by purlJam.uk
Access your pattern anytime
Bookmark this page to access your pattern anytime