Type
Crochet
Difficulty
intermediate
Category
amigurumi
AI Thinking Process
Planning
Verification
Pattern
White Dove Amigurumi
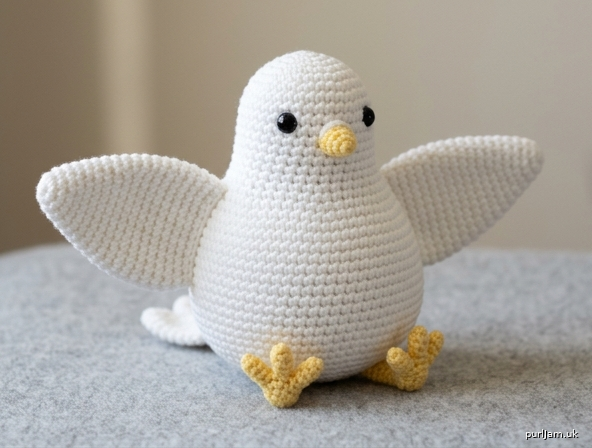
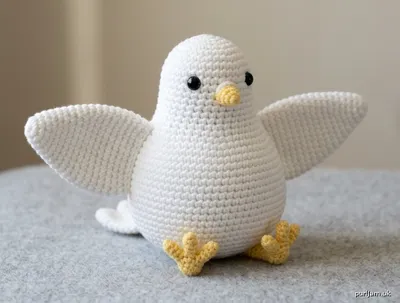
A plump sitting dove with a pear-shaped body, wide oval wings, and yellow three-toed feet. Worked in separate pieces and sewn together.
Skill level: Intermediate
Finished size: About 7 in (18 cm) tall from feet to crown; wingspan about 8½ in (22 cm) with wings spread.
Materials
- Worsted weight yarn (medium 4), white: 120 yd (110 m)
- Worsted weight yarn (medium 4), yellow: 25 yd (23 m)
- US E-4 / 3.5 mm crochet hook
- 9 mm safety eyes (1 pair)
- Polyester fiberfill
- Stitch marker
- Yarn needle
- Scissors
Optional: Black embroidery floss if you prefer embroidered eyes instead of safety eyes.
Gauge
5 sc and 5 rnds = 1 in (2.5 cm) in single crochet worked in the round.
Gauge is not critical for this project, but a firm fabric (no stuffing showing) is. Change hook size if your stitches are loose.
Abbreviations (US)
- ch — chain
- sc — single crochet
- inc — increase (2 sc in the same stitch)
- dec — invisible decrease (insert hook in front loops of next 2 sts, yarn over, pull through both, yarn over, pull through 2)
- sl st — slip stitch
- st(s) — stitch(es)
- rnd(s) — round(s)
- MR — magic ring
- FO — fasten off
Notes
- Work in a continuous spiral unless the pattern says otherwise. Do not join rounds. Mark the first stitch of each round and move the marker up as you go.
- The invisible decrease keeps the fabric smooth; a regular sc2tog is fine if you prefer it.
- Stuff the body more firmly in the wide lower section so the pear shape holds.
- Do not stuff the wings or tail; flatten them before sewing.
- Safety eyes are a choking hazard. Do not use them on a toy for a child under 3 years; embroider eyes instead.
Head (white)
Rnd 1: 6 sc in MR. (6) Rnd 2: Inc in each st around. (6 increases → 6 + 6 = 12 ✓) Rnd 3: (Sc in next st, inc) 6 times. (6 increases → 12 + 6 = 18 ✓) Rnd 4: (Sc in next 2 sts, inc) 6 times. (6 increases → 18 + 6 = 24 ✓) Rnd 5: (Sc in next 3 sts, inc) 6 times. (6 increases → 24 + 6 = 30 ✓) Rnd 6: (Sc in next 4 sts, inc) 6 times. (6 increases → 30 + 6 = 36 ✓) Rnds 7–12: Sc in each st around. (36) — 6 rounds
Place 9 mm safety eyes between rnds 8 and 9, 7 stitches apart, centered on the face. Do not attach the washers until you are happy with placement.
Rnd 13: (Sc in next 4 sts, dec) 6 times. (6 decreases → 36 − 6 = 30 ✓) Rnd 14: (Sc in next 3 sts, dec) 6 times. (6 decreases → 30 − 6 = 24 ✓) Rnd 15: (Sc in next 2 sts, dec) 6 times. (6 decreases → 24 − 6 = 18 ✓)
Stuff the head firmly, keeping it round. Leave the remaining 18 sts open. FO, leaving a 12 in (30 cm) tail for sewing.
Body (white) — pear shape, start at the bottom
Rnd 1: 6 sc in MR. (6) Rnd 2: Inc in each st around. (6 increases → 6 + 6 = 12 ✓) Rnd 3: (Sc in next st, inc) 6 times. (6 increases → 12 + 6 = 18 ✓) Rnd 4: (Sc in next 2 sts, inc) 6 times. (6 increases → 18 + 6 = 24 ✓) Rnd 5: (Sc in next 3 sts, inc) 6 times. (6 increases → 24 + 6 = 30 ✓) Rnd 6: (Sc in next 4 sts, inc) 6 times. (6 increases → 30 + 6 = 36 ✓) Rnd 7: (Sc in next 5 sts, inc) 6 times. (6 increases → 36 + 6 = 42 ✓) Rnds 8–11: Sc in each st around. (42) — 4 rounds (wide belly) Rnd 12: (Sc in next 5 sts, dec) 6 times. (6 decreases → 42 − 6 = 36 ✓) Rnds 13–14: Sc in each st around. (36) Rnd 15: (Sc in next 4 sts, dec) 6 times. (6 decreases → 36 − 6 = 30 ✓) Rnds 16–17: Sc in each st around. (30) Rnd 18: (Sc in next 3 sts, dec) 6 times. (6 decreases → 30 − 6 = 24 ✓) Rnd 19: Sc in each st around. (24) Rnd 20: (Sc in next 2 sts, dec) 6 times. (6 decreases → 24 − 6 = 18 ✓) Rnd 21: Sc in each st around. (18)
Stuff firmly, packing extra fill into rnds 8–12 so the lower body stays plump and the neck tapers. Leave the remaining 18 sts open. FO, leaving an 18 in (45 cm) tail for sewing to the head.
Wings (white, make 2)
Worked as a long oval so the wings read wide when attached. Do not stuff.
Ch 12. Rnd 1: 2 sc in 2nd ch from hook, sc in next 9 ch, 3 sc in last ch; working along the opposite side of the foundation chain, sc in next 9 ch, 1 sc in the same ch as the beginning 2 sc. (2 + 9 + 3 + 9 + 1 = 24 ✓) Rnd 2: Inc in next 3 sts, sc in next 9 sts, inc in next 3 sts, sc in next 9 sts. (6 increases → 24 + 6 = 30 ✓) Rnd 3: (Sc in next st, inc) 3 times, sc in next 9 sts, (sc in next st, inc) 3 times, sc in next 9 sts. (6 increases → 30 + 6 = 36 ✓) Rnd 4: (Sc in next 2 sts, inc) 3 times, sc in next 9 sts, (sc in next 2 sts, inc) 3 times, sc in next 9 sts. (6 increases → 36 + 6 = 42 ✓) Rnds 5–7: Sc in each st around. (42) — 3 rounds
FO, leaving an 18 in (45 cm) tail. Flatten the oval firmly so it lies completely closed. The piece should measure about 4 in (10 cm) long and 2 in (5 cm) wide.
Legs (yellow, make 2)
Each leg is three toes joined into one foot, then worked up into a slim shaft.
Toes (make 3 per leg — 6 total)
Rnd 1: 4 sc in MR. (4) Rnds 2–3: Sc in each st around. (4)
FO the first two toes of each set and weave in those tails. Do not FO the third toe; keep the live loop on the hook.
Join the foot
With the live third toe still on the hook, sc in each of the 4 sts of toe 3, then sc in each of the 4 sts of toe 2, then sc in each of the 4 sts of toe 1. (4 + 4 + 4 = 12 ✓)
Push the three toes together so they sit in a small fan (two outer toes slightly forward, center toe in the middle). Use the woven-in tails to take one or two tacking stitches between the toes at the join if they gap.
Next rnd: (Sc in next st, dec) 4 times. (4 decreases → 12 − 4 = 8 ✓) Rnds 3–8 of leg: Sc in each st around. (8) — 6 rounds
FO, leaving a 12 in (30 cm) tail. Lightly stuff the 8-st shaft only; leave the toes unstuffed so they stay flat and finger-like.
Beak (yellow)
Rnd 1: 4 sc in MR. (4) Rnd 2: (Sc in next st, inc) 2 times. (2 increases → 4 + 2 = 6 ✓) Rnds 3–4: Sc in each st around. (6)
FO, leaving an 8 in (20 cm) tail. Push the yarn tail and a pinch of fiberfill (or the starting tail) into the cone so it holds a point.
Tail (white)
Rnd 1: 6 sc in MR. (6) Rnd 2: Inc in each st around. (6 increases → 6 + 6 = 12 ✓) Rnd 3: (Sc in next st, inc) 6 times. (6 increases → 12 + 6 = 18 ✓) Rnd 4: (Sc in next 2 sts, inc) 6 times. (6 increases → 18 + 6 = 24 ✓) Rnd 5: Sc in each st around. (24)
FO, leaving a 12 in (30 cm) tail. Do not stuff. Flatten into a small fan.
Assembly
Use the yarn tails and a yarn needle. Pin every piece first and check the silhouette from the front and the side before sewing.
- Beak. Sew the beak to the head, centered between and just below the eyes, covering parts of rnds 10–12. The point faces forward and slightly down.
- Head to body. Match the 18-st opening of the head to the 18-st opening of the body. Sew all the way around with whipstitch, adding a little extra stuffing at the neck if the join dips.
- Wings. Place one wing on each side of the body. The inner short curve (one rounded end of the oval) sits against the body from about body rnds 15–19, slightly toward the back. Sew only that inner edge (about one-third of the oval) so the rest of the wing stands free. Angle the wings backward and outward for a wide span. Repeat on the other side, matching height and angle.
- Tail. Sew the flattened tail to the lower back of the body (about body rnds 8–12), fanned horizontally and sitting just above the widest part of the pear.
- Legs. Sew the open top of each 8-st shaft to the underside of the body, on either side of rnds 5–8, about 4–5 sts apart. Point the three toes forward. Short, slightly splayed legs let the dove sit stably on its plump belly.
- Weave in every remaining tail on the inside or along a seam.
Finishing
Steam-block the wings and tail lightly under a cloth if they curl (do not press stuffed pieces). Shape the pear body with your hands so the belly is full and the neck is narrow. Adjust the wings so they sit wide and even.
If you did not use safety eyes, embroider two small satin-stitch eyes in black floss where the safety eyes would have sat.
Your dove is ready.
Disclaimer: This pattern was generated by AI and should be reviewed for accuracy before use. While we strive for quality, AI-generated content may contain errors. Please verify measurements, stitch counts, charts, and instructions before beginning your project. Generated by purlJam.uk
Love this pattern?
Save this pattern to your free PurlJam libraryAccess your pattern anytime
Bookmark this page to access your pattern anytime